On this page, we explain the method by which a micrometer is used to determine the depth or the size of an object.
Using a Micrometer to Determine the Depth or Size of an Object
A micrometer, often referred to as a micrometer screw gauge, is a precision measuring instrument used to measure dimensions with great accuracy. It typically has a range of 0 to 25mm and can measure up to one-hundredth of a millimeter (0.01mm). While commonly employed for measuring the diameter or thickness of objects, it can also measure depth when using a depth micrometer.
The Method by Which a Micrometer is Used to Determine the Depth or the Size of an Object
The method by which a micrometer is used to determine the depth or size of an object involves placing the object between the spindle and the anvil, rotating the thimble until the spindle lightly touches the object, locking the spindle position, and then reading the measurement by combining the values indicated on the sleeve and thimble. For depth measurements, a depth micrometer is used, where a rod extends from its base into the depth to be measured, and the reading is similarly taken.
Here’s how a micrometer is used to determine the depth or size of an object:
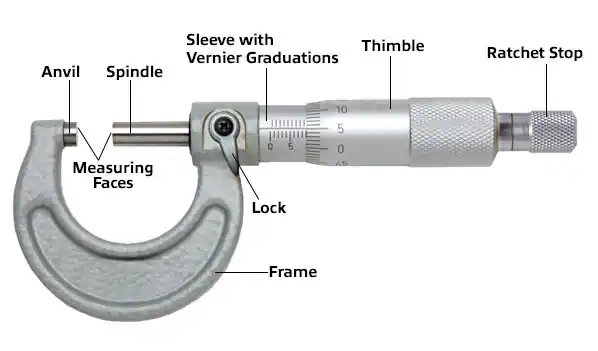
1. Understand the Components of the Micrometer:
- Frame: This holds the entire instrument together.
- Anvil: A fixed reference point against which the object is placed.
- Spindle: A precision screw mechanism which moves towards or away from the anvil.
- Thimble: Contains the scale and is rotated to move the spindle.
- Sleeve (or Barrel): Has the main scale that is static.
- Lock: Secures the spindle’s position after measurement.
- Ratchet Stop (or Ratchet Knob): Ensures uniform force when tightening.
2. Zeroing the Micrometer:
Before taking any measurements, ensure that the micrometer reads zero when fully closed. If it doesn’t, consult the instrument’s manual on how to calibrate or zero it.
3. Measuring the Size or Thickness:
- Open the thimble until the object fits between the spindle and the anvil.
- Place the object between the spindle and anvil.
- Rotate the ratchet knob or thimble until the spindle lightly touches the object.
- Lock the spindle using the lock mechanism.
- Read the measurement by combining the sleeve and thimble readings. The sleeve provides the value in millimeters and tenths of a millimeter, while the thimble offers further precision.
4. Measuring Depth (Using a Depth Micrometer):
Depth micrometers are slightly different in design. Instead of measuring between a spindle and anvil, a rod extends from the bottom of the micrometer to measure depths.
- Place the base of the micrometer flat on the surface from which you want to measure the depth.
- Extend the rod into the depth (hole or slot) you wish to measure.
- Rotate the thimble until the rod bottoms out in the hole or slot.
- Lock and read the measurement as with the standard micrometer.
5. Recording and Interpreting the Reading:
Once you’ve taken your measurement, it’s essential to record it immediately. Remember to always include the units (usually millimeters). To ensure accuracy, it’s a good practice to measure multiple times and take an average, especially if you’re new to using a micrometer.
6. Care and Storage:
After use, clean the anvil and spindle with a soft cloth to remove any debris. It’s crucial to store the micrometer in its protective case to keep it free from dirt and avoid any potential damage.
Conclusion
A micrometer is an indispensable tool for those who require precise measurements. Whether you’re measuring the thickness of a sheet of paper or the depth of a hole in metal, understanding how to correctly use and read a micrometer ensures accuracy and consistency in your measurements.


