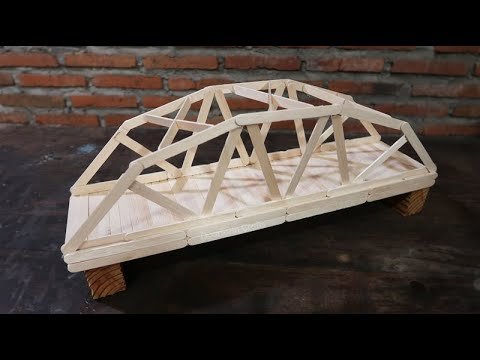
How to Build a Bridge for School Project: Grade 9.
What does bridging a bridge teach grade 9 learners
Building a bridge as a school project can teach grade 9 learners various valuable lessons and skills, including:
- Engineering principles: Building a bridge model introduces students to basic engineering concepts like forces, tension, compression, and structural design. Students learn how different types of bridges (truss, beam, arch, suspension) function and distribute loads.
- Problem-solving: Students must consider the constraints of their design, such as materials, span, weight capacity, and stability. They need to think critically and creatively to develop a bridge that can withstand applied forces while meeting design criteria.
- Mathematics: Students apply geometry and basic mathematical calculations when designing and constructing their bridge. They may need to calculate angles, lengths, and forces to ensure a structurally sound design.
- Physics: Bridge-building projects help students understand the practical application of physics concepts like forces, equilibrium, and material properties. Students learn how the forces of tension, compression, and torsion act upon different bridge components.
- Teamwork and collaboration: In many cases, students work in groups to design and construct their bridge, requiring effective communication, collaboration, and compromise to achieve their goals.
- Research skills: Students may need to research different types of bridges, materials, and construction techniques to create a successful bridge design. This helps improve their research and information-gathering skills.
- Time management and organization: Bridge building projects often have deadlines and require students to manage their time effectively. They must balance project planning, design, construction, and testing within the given timeframe.
- Presentation and communication skills: After completing the bridge, students may need to present their project to their classmates or in a competition. This helps improve their public speaking, presentation, and communication skills.
- Creativity and innovation: Bridge building projects encourage students to think creatively and explore innovative design solutions to meet the project requirements.
- Hands-on learning: Constructing a bridge model provides a hands-on learning experience that helps students connect theoretical concepts to real-world applications. This can lead to a deeper understanding of the subject matter and foster a greater interest in engineering and STEM (Science, Technology, Engineering, and Mathematics) fields.
How to Build a Bridge for School Project: Grade 9
Building a bridge for a school project can be a fun and educational experience. Here’s a simple step-by-step guide to building a bridge model using materials like popsicle sticks, glue, and string. This type of bridge is a basic truss bridge design.
Materials needed:
- Popsicle sticks (about 100-200, depending on the size of your bridge)
- White glue or wood glue
- String or thin wire (optional, for added support)
- Ruler
- Scissors
- A flat workspace
Instructions:
- Plan your bridge design: Sketch out a simple truss bridge design on paper. Truss bridges use triangles to distribute weight and provide support. The most common truss bridge design is the Warren Truss, which consists of alternating equilateral triangles.
- Measure and cut the popsicle sticks: Using a ruler, measure the popsicle sticks and cut them to the desired length for your bridge. You can use scissors to gently score the sticks, then snap them to the desired length. You’ll need equal lengths for the top and bottom chords (horizontal parts) of your bridge, as well as diagonal and vertical supports.
- Build the truss sides: Lay out two parallel popsicle sticks as the top and bottom chords of one truss side. Then, glue the diagonal and vertical support sticks to create triangles between the chords. Repeat this process to create a second identical truss for the opposite side of your bridge.
- Connect the trusses: Once the truss sides have dried, glue additional popsicle sticks horizontally between the two trusses to create the bridge’s roadbed. You can also add extra vertical and diagonal supports between the roadbed and the bottom chord for added strength.
- Add reinforcement (optional): If you want to add more support to your bridge, you can use string or thin wire to create tension members. Tie the string or wire to the top of each vertical support and then to the bottom of the next vertical support, creating an “X” pattern between the trusses.
- Allow the glue to dry: Once you’ve completed the assembly, let the glue dry completely before testing the strength of your bridge. This may take several hours or overnight, depending on the glue you used.
- Test your bridge: Place your bridge between two supports (e.g., stacks of books) and gradually add weight to the center of the bridge to test its strength. Take note of how much weight your bridge can hold before it collapses or deforms.
Another Example: Video
Remember, this is just one example of a bridge design you can create for your project. You can research other types of bridges (like beam, arch, or suspension) and adapt this guide to fit the design you choose.


