Why do the youth in South Africa seem not interested in valuing a safe and living environment within their communities? In the South African...

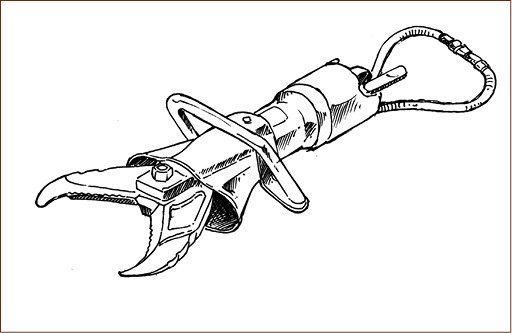
Instructions for Mini Pat Technology Grade 7 Term 1 Answers: Jaws of life with a Step by Step guide.
The ‘jaws of life’ are a hydraulic-extrication rescue tool used in a number of difficult emergency situations, particularly car crashes. It is most often used to pull drivers and passengers out of damaged vehicles after severe traffic collisions.
Indian Expression
Below is a Jaws of life school project for Grade 7 Step by Step video done by Ahmed Hansa
What materials are used to make Jaws of Life
How to make jaws of life school project:
http://www.mstworkbooks.co.za/technology/gr7/gr7-technology-07.html
Why do the youth in South Africa seem not interested in valuing a safe and living environment within their communities? In the South African...
Radiography studies High School Requirements in SA To pursue radiography in South Africa, students typically need to meet the following requirements: Recommended SubjectsIncluding these...

ACT Cape Town Courses and Programmes 2024/2025 (Prospectus): ACT Cape Town Courses and Programmes 2024/2025 (Prospectus) ACT Cape Town, a premier film acting academy...
On this page, we Discuss Why Unequal Access to Basic Services Could Give Rise to Social Injustices Unequal access to basic services is a...

Guide: Writing a Conclusion for an Essay on “Why the Bantu Education Act Is Interesting or Important to Know About Today: Writing a conclusion...

Why I Admire Nelson Mandela Essay Guide and Example: The essay titled “Why I Admire Nelson Mandela” presents a unique opportunity to delve into the...